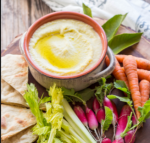
Today’s International Inspiration for using up Thanksgiving leftovers will take us to Greece. This next recipe was inspired by a trip to a local taverna – by local I mean Northern NJ, where I live, not local as in Mykonos. This is my take on skordalia, a Greek potato and garlic dip. I have omitted the almonds because I try to keep my recipes as allergy free/friendly as possible. This dip can be served as an appetizer or a side with toasted pita, crackers, or crudité. You know, because you probably have some of those left over as well.
Greek Potato and Garlic Dip with Crudite
Ingredients
Baking Potatoes – 2 large
Garlic – 1 head (roasted)
Olive Oil – about ¼ cup (or as needed)
Lemon Zest and Juice – 1 lemon
Dill – 2-3 tbs. chopped
Salt – to taste
Crudite – any veggies you like cut into small pieces: celery, carrots, cucumbers, etc.
Directions
Preheat oven to 400 degrees.
Peel and chop potatoes into large pieces.
Boil in salted water until cooked through.
Cut the top of the head of garlic off to expose cloves. Drizzle garlic with olive oil and wrap in aluminum foil. Roast in oven until softened – about 30 minutes.
In a food processor puree potatoes, 2-3 cloves of roasted garlic, lemon zest, at least 1 tsp. salt, about 1 tsp. of lemon juice, and half the dill. Drizzle in olive oil until you get the consistency you like.
Taste and adjust seasonings.
Spoon into large serving bowl and garnish with remaining dill.
In my most recent post, I suggested a list of ingredients that I recommend you keep on hand on a regular basis. My reasons for choosing these ingredients are that they are easy to find, healthy, and inexpensive – and can provide a long list of versatile and delicious meals.
I gave you a list of ingredients and a list of 8 dishes you can make with them. I have previously provided 4 recipes and now I will provide the final 4. In my next post I will provide a game plan for keeping an abundance of prepared food on hand with minimal planning and work. If you are willing to do a little extra labor for a couple of nights, you can probably save yourself 2 or 3 nights of cooking later on.
I previously provided recipes for Black Beans and Rice, Lentil Soup, Vegetable Soup, and Stuffed Peppers. The remaining recipes follow.
Vegetarian Chili Veggie Stir Fry Fried Rice Quick Refrigerator Pickles
Vegetarian Chili
1 medium onion – chopped
1 medium to large bell pepper – chopped
1-3 cloves of garlic – minced
1 (or more) chile of choice – minced (I like serranos and jalapenos for this)
3 cups of canned tomatoes (pureed, strained, sauce)
1 cup of water
3-4 cups of cooked beans of choice (or 2 cans, drained and rinsed)
Cilantro (optional)
Oil, Salt, Pepper (as needed)
Heat up some oil (enough to coat the bottom of the pan or pot you are using). Saute onions and peppers for a few minutes. Add garlic and chile and saute for another minute or two. Add tomatoes and water and simmer for 5 or 10 minutes to combine flavors. Add salt and pepper as needed. Add in cooked beans. Simmer for 20-30 minutes. Adjust seasonings as you go. Finish with chopped cilantro to taste. For a more filling meal, serve over rice.
Note: Try to use at least 2 kinds of beans for this dish. It’s nice to have variety. My favorite beans for chili are black, pink, kidney, and garbanzo. Feel free to use any kind you like.
Veggie Stir Fry
Chopped Veggies of your choice (2-4 cups)
1-3 Garlic Cloves – minced
Chile – minced (optional)
Oil (one that can stand a high heat such as canola or coconut)
Water – approx. ¼ cup
Tamari – to taste
Cilantro (optional)
Cooked Rice – 2 cups
I like to use big chunks of veggies for this. Just make sure they are similar in size so they cook at the same rate. The veggies we have on hand from the shopping list are carrots, celery, onions, and bell peppers. Heat up some oil in a sauté pan. Add all the chopped veggies and sauté for a few minutes. When veggies are cooked about halfway through, add the garlic and chiles. Small pieces of garlic burn quickly and can ruin a dish so we add them later in the cooking process. Cook for about 2 minutes and add some water. We add the water for 2 reasons. One, it will create steam and speed up the cooking process. Two, it will keep the garlic from burning. Add tamari to taste. Finish with cilantro and serve over cooked rice.
Fried Rice
Chopped Veggies of your choice (2-4 cups)
Garlic – minced
Chile – minced (optional)
Oil (one that can stand a high heat such as canola or coconut)
Water – approx. ¼ cup
Tamari
Cilantro (optional)
Cooked Rice – 2 cups
I like to use smaller chunks of veggies for this. Just make sure they are similar in size so they cook at the same rate. The veggies we have on hand from the shopping list are carrots, celery, onions, and bell peppers. Heat up some oil in a sauté pan. Add all the chopped veggies and sauté for a few minutes. When veggies are cooked about halfway through add the garlic and chiles. Small pieces of garlic burn quickly and can ruin a dish so we add them later in the cooking process. Cook for about 2 minutes and add some water. We add the water for 2 reasons. One, it will create steam and speed up the cooking process. Two, it will keep the garlic from burning. Add tamari to taste. Stir in the fried rice and cook until everything is mixed together and heated through.
Note: This recipe is very similar to the Veggie Stir Fry. The difference is that you chop the veggies into smaller pieces and you add the cooked rice into the pan instead of serving the veggies over the rice. Also, this is a great time to use the leftover rice from the fridge. No need to make fresh rice. The old stuff actually works better.
Quick Refrigerator Pickles
2 Cups of Water
1 cup of Vinegar (I like white or apple cider)
1 tablespoon of salt
1 tablespoon of sugar (or agave or honey)
3 cups of Veggies of your choice (carrots are my favorite but celery works too)
Bring water, vinegar, salt, and sugar to a boil and let simmer for a few minutes until salt and sugar dissolve. Clean, peel, and slice veggies into bite-size pieces. Place in clean glass jars. Pour in pickling liquid. Let this cool before you cover with lids. Place in refrigerator. These will be ready in a few hours and keep for about 2 weeks, if refrigerated. They only get better with time. Serve as a snack, side dish, on a sandwich, any way you like. These pickles will be very mild. Feel free to adjust salt and sugar ratios or add garlic or chiles to spice things up a bit. If using garlic or chiles, add them to the cooking liquid and simmer along with the other ingredients.
Note: You can save old jars from store-bought pickles, or salsa for this use. No need to buy new ones. You can also use plastic containers, but I prefer glass for this.
All you need is love…
Well actually all you really need are carrots, celery, onions, and a few other things to create delicious meals on a regular basis. You know how I feel about ingredients. They are affordable and enable you to prepare your own healthy meals whenever you please. I’ll give you two lists of things that you should keep on hand to make delectable dishes and a couple of easy peasy recipes to prove it.
Fresh Ingredients
Carrots
Onion
Celery
Bell Peppers
Garlic
Chilies (jalapeno, Serrano, etc.)
Cilantro (or any fresh herb you use on a regular basis)
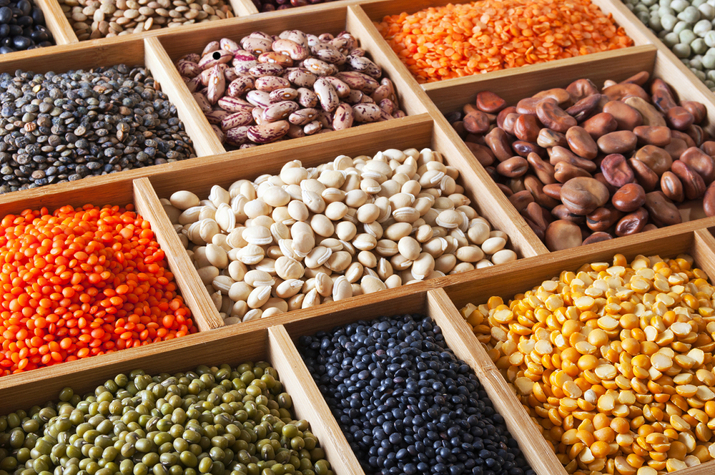
Pantry Ingredients
Rice
Beans (at least 2 or 3 kinds)
Stock/Broth (I like vegetable, but chicken or beef work too)
Canned tomatoes (diced, pureed, whole)
Oils
Vinegars
Tamari (gluten free soy sauce)
I’m working under the assumption that you have salt, pepper, and sugar (or some kind of sweetener) on hand already.
Let me explain my rationale for these choices. There are certain bases that you can create for any number of dishes. I’m all about that base, ‘bout that base. Sorry I couldn’t resist. Here are some examples.
Mirepoix is a classic French combination of diced carrots, celery, and onions. It’s usually one part carrots, one part celery, two parts onion. For example, it would be ¼ cup of carrots, ¼ cup of celery, ½ cup onions. It’s a great start for soups and stews.
Trinity is classic in New Orleans cooking. It’s a combination of diced celery, onions, and bell peppers. I’m pretty sure you can’t make gumbo without it, although I’m not a gumbo expert.
Sofrito is a Latin base that is much more flexible in it’s ingredient list, but could include any or all of the following: onions, bell peppers, chilis, garlic, cilantro. The list goes on. There are as many variations as there are cooks.
Here is a short list of meals you can create with the ingredients listed above and, as promised, recipes follow. There are also links to recipes that I have provided previously on this site.
Vegetable Soup Lentil Soup Black Beans and Rice Vegetarian Chili Veggie Stir Fry Fried Rice Stuffed Peppers Quick Refrigerator Pickles
Vegetable Soup (Vegan)
1 quart vegetable stock
2 cups water
1-15oz. can diced tomatoes with it’s liquid
2-3 carrots, sliced
2-3 celery stalks, sliced
¼ to ½ cup onion, diced
Salt & Pepper to taste
Combine all ingredients in a large pot. Simmer until vegetables are cooked through. Adjust seasonings to taste.
Note: Add any additional vegetables that you have on hand. This is a great way to use up leftover veggies. Just don’t cook them for as long as the raw ones. Feel free to add any herbs and spices that you like as well. You can even add some beans to bump up the protein and make the soup a more complete meal.
Variations
Gringa Style: Add 1 tsp. each of cumin and chili powder as well as ½ cup each of sliced zucchini and corn kernels. To finish, add some chopped cilantro. Some cooked black or pink beans would also be a delicious addition. (add approximately ½ cups of beans or more to your liking)
Italiano Style: Add 1 tsp. (or more to taste) of each dried basil and dried parsley. Add up to 1 cup zucchini and/or summer squash as well as some cooked white or garbanzo beans. (add approximately ½ cup of beans or more to your liking)
Stuffed Peppers (Vegan)
2 – 4 bell peppers (any color you like) Leftover Black Beans and Rice Tomato Sauce, at least 2 cups
Preheat oven to 350 degrees. Cut bell peppers in half. Remove stems and seeds. Stuff with leftover Black Beans and Rice. Place peppers in baking dish. Cover with tomato sauce. Cover with aluminum foil. Bake for 20-30 minutes or until peppers are cooked and everything is heated through.
Note: If you really want to be efficient and save yourself another night of cooking, prep the peppers on the same night that you prepare the Black Beans and Rice. Double the recipe, if necessary. Set everything up in a baking dish, cover and refrigerate (or freeze). On a night when you don’t have time to cook, pop the baking dish in a 350 degree oven and cook through.
Okay, let’s just say that I LOVE hummus. It’s delicious, affordable, versatile, and crowd-pleasing. My husband and I have often made a meal of it with sliced veggies and pita bread or crackers. I personally use dried beans almost exclusively, but in this case I often make an exception. The recipe below is very straightforward and easy to remember so that’s the one I’m providing. It’s basically one of everything: 1 can of beans, 1 clove of garlic, 1 tsp. tahini, 1 lemon. Olive oil and salt as needed. It’s extremely easy to double the recipe. I wouldn’t make more than 2 cans worth (or ½ lb. dried) at a time as the food processor might not be able to accommodate more ingredients. You can also use this recipe if you have a mini-food-processor. The one of everything version is perfect. The only issue is that you can’t drizzle the olive oil while the processor is going. You have to add a little olive oil at a time and start and stop until you get the consistency you like.
Hummus
1 can of garbanzo beans (drained and rinsed) or ¼ lb. of dried garbanzo beans (soaked, and cooked)
1 clove of garlic (or more to taste)
1 tsp. tahini
1-2 lemons – juice and zest (optional)
Olive oil as needed
Salt to taste
Wash and dry lemons and zest them. Crush and peel garlic clove. Add drained beans, tahini, salt, lemon zest, and lemon juice (to taste) to the food processor. I like lemony hummus so I use a lot of lemon. Start processor and drizzle in olive oil until you get the consistency you like. Adjust seasonings. Serve with veggies, pita bread, crackers, chips. Hummus also makes a great sandwich or wrap. Spread bread with hummus and pile on whatever veggies you like.
Note: Tahini can have a seemingly high price tag when compared with the other ingredients. Keep in mind that a little goes a long way. It keeps in the fridge indefinitely, and even if you made hummus once a week, your supply would last from 6 months to 1 year. Also, you can skip it. It’s not mandatory but I think it adds a nice flavor. That being said, if I didn’t have tahini on hand, I would still make hummus.
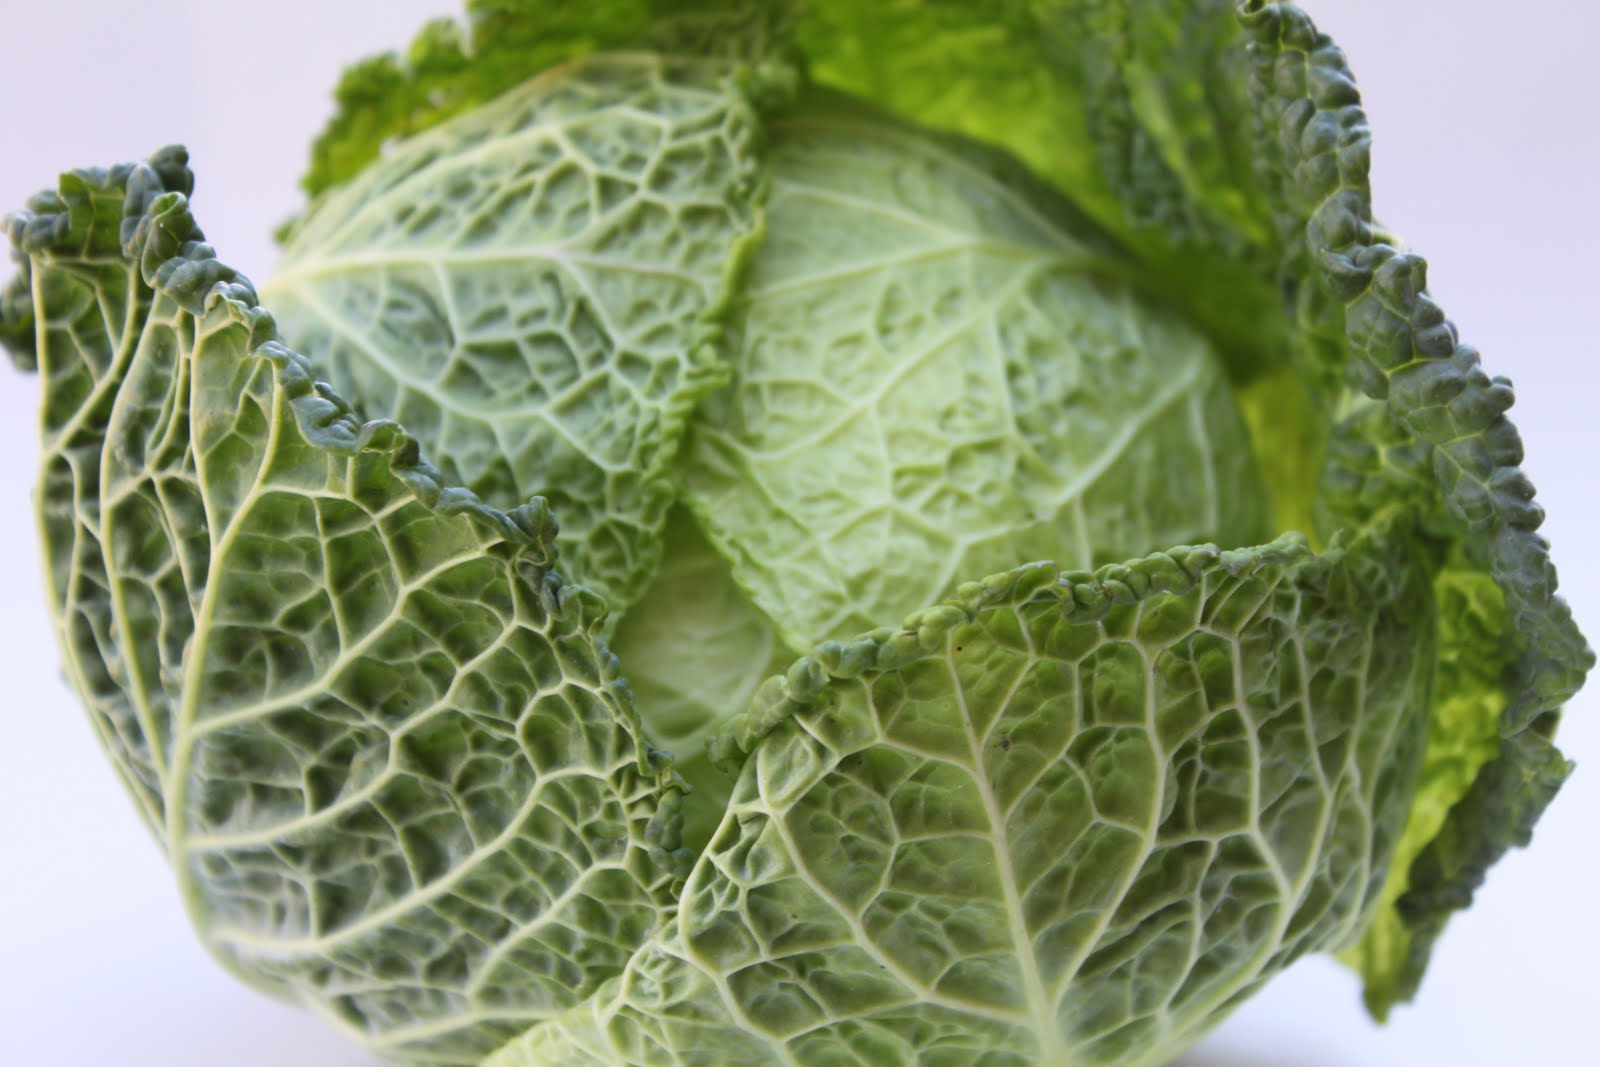
Greens and beans are an Italian classic, especially escarole and white beans with lots of garlic. If you are not familiar with escarole, it resembles a thicker head of green leaf lettuce. It’s delicious and stands up to cooking, but can also be used in salads if it’s allowed a little time to marinate in it’s dressing. I love escarole but I also love cabbage, and I find it to be less expensive and more versatile. Since this is part of my Veganomics series, I’m going with the cabbage for this recipe. You can use any cabbage you like, green cabbage, savoy cabbage, or napa cabbage. These are the three most popular ones that I find readily available. I love savoy cabbage. I call it “medium” cabbage. Regular cabbage can be a little heavy and napa tends to be very light. While the savoy can be a little pricier than the green, I don’t mind spending a little extra and it still stretches a buck.
Even though we are basing this Veganomics series on the versatility and delicious nature of beans, I’d like to give you some ideas for using the leftover greens from the recipe below.
Slice it up for a lighter version of cole slaw
Chop or slice it and use it as a base for salad in place of your favorite lettuce
Add to soups, stews, or stir-fries to bump up the vitamins and fiber in your meal
Use it as a wrap in place of bread or tortillas
Use whole leaves as serving containers for dips at parties
As I’m writing this, I’m thinking that cabbage might play a big role in my next Veganomics series. More to come on that…
Here is my favorite recipe for greens and beans. Mangia!
Greens and Beans
½ lb. of dried white beans (or 2 – 15 oz. cans drained and rinsed)
½ head of savoy cabbage – thinly sliced
1-3 cloves of garlic
Salt and Pepper
Oil of choice for sautéing
Red pepper flakes to taste (optional)
Fresh lemon juice to taste (optional)
Cooking the beans
Rinse and then soak dried beans for at least a couple of hours or overnight, if possible. If you don’t have time to soak the beans, you can skip this step. Just keep in mind that it could extend your cooking time. Simmer for approximately 30 minutes to 1 hour until they are cooked through. Add about one teaspoon of salt to the beans about halfway through cooking. If using canned beans, skip this step.
Coat the bottom of a large sauté pan with oil. Over low heat, cook whole cloves of garlic until they are very soft. Remove them from the oil. Mash the garlic with a little salt to make a paste. At this point you can raise the cooking heat to about medium. Add the cabbage and cook until wilted. If the pan seems a little dry add some water. This will create some steam and quicken the cooking time without having to add extra oil. Remove cabbage from the pan. Add a little extra oil if needed and then sauté the white beans to heat through and soften up. Add in the mashed garlic and stir to incorporate with the beans. Add cabbage back in and cook until everything is heated through and cooked to your liking. Along the way add salt and pepper to taste. Pile on a serving platter. Just before serving you can drizzle lightly with a good quality olive oil and some lemon juice or balsamic vinegar. Use the red pepper flakes at any point during the cooking process or serve at the table for a finishing touch. Enjoy. Serves 4 as a generous main course portion or as a side dish for 6 – 8 people.
Leftover Tips
While this is delicious reheated, as is, for lunch or dinner, here are some other tasty options.
Turn it into a soup, by adding stock and veggies of your choice (i.e., diced potatoes, carrots, tomatoes) and simmering until the veggies are cooked through. Adjust seasonings and enjoy.
Toss it with pasta and sun-dried tomatoes and dress with some pasta water and olive oil.
I came across an article today about making a vegan diet more affordable. At first, it seemed odd because I think of vegan diets as being very affordable. Rice and beans are the poster children for veganism. Right? After much consideration, it occurred to me that the sudden popularity of “green juices” and some of the prices that I see at the farmer’s market, can make it difficult to eat well on a budget. Let’s face it, most of us can’t afford micro-greens at $5 per ¼ lb. You’re not fooling anyone. That’s $20 per pound – for lettuce.
This has inspired me to share my first Veganomics series. This week, I will provide you with one recipe every day highlighting beans. Beans are versatile and affordable and delicious.
I will also share some thoughts and tips on beans to help you plan and executive these recipes. Here are a few to get you started.
I like to use dried beans. I find that you get more value, but they do take considerably more time and planning. Of course, you are welcome to use canned. They are still very affordable and easy and nutritious.
A one-pound bag of beans works out to roughly four cans of beans. If you are buying in bulk, one cup of beans is roughly ½ pound or the equivalent of two cans.
You should always sort through dried beans and rinse them thoroughly before soaking or cooking.
You don’t have to soak your beans but it will shorten the cooking time dramatically.
You can soak your beans overnight to shorten cooking time. If you are going to soak them for longer than 12 hours, I would swap out the water at least once. Just drain and rinse and cover with fresh water. You can soak them at room temperature for up to 24 hours. You can also soak them in the fridge for up to 2 days if you think you might not get to cook them right away. Just swap out the water about every 12 hours or so.
You can cook an entire bag of beans and then freeze any that you are not using immediately. A good plan is to cook them all and then divide and store in four parts. Consider each part the equivalent of one can of beans.
Normally I wouldn’t share 5 recipes in 1 week, but I want you to see that you can make these recipes all in a week and have delicious, nutritious options for lunch and dinner and never get bored. And if you are cooking for one or two people, you can even freeze portions for the future, which will save you time and money in the long run. I’ll provide leftover tips along the way. At the end of the week, I will provide a shopping list to show you how, by having minimal and affordable ingredients on hand, you can eat really well.